Sunday, April 28, 2013

Those Pesky Seeds

Tomato seeds should only be used for one thing... planting in the ground to make more tomatoes!

If you are like me and love everything about tomatoes and every type of tomato, then you also know the havoc an improperly prepared tomato can reap on your dishes. 

I've seen it too many time at too many picnics... you know what I am talking about... the dish at the pot luck that nobody seems to touch.  These innocent pasta salads and tossed salads didn't do anything wrong, but because of one simple step, they turned into a water yucky-looking mess.  I mean, really... who wants to eat a mix of tomato water and mayo... and what a disgusting color!!!  What a waste of some once-delicious produce!

Properly de-seeding your tomatoes prior to use can really add longevity to your tomatoes and help keep your prepared foods fresh looking longer. 

For this example, I am using a run of the mill greenhouse tomato.  Nothing much is in season right now, but my local produce market has had some great looking locally grown greenhouse tomatoes.  I can't wait to start my tomato plants so all I have to do is step on my back deck to grab a fresh tomato!


I didn't take pictures of this step, but I sliced my tomato in 8ths.  First in half, then the halves in half, then those halves in half.  This is what you end up with!  The tomato looks great, right? Well those seeds just HAVE to go.  See the stuff that the seeds are expanded in?  Well, add some salt to that and it gets awfully watery.  Watery is generally not a good description of anything I want to eat.
 

Get some cool water running in the sink at a moderate rate.  Hold your tomato under the water with the stream hitting right where your seeds are.  This will help rinse all of our unwanted tomato away.


Now, just rub your finger along the seeds.  You may have to pinch where the seeds attach to the tomato and sort of tear it away.  It doesn't take much force.
 
 
Lastly, pat your tomato dry, making sure to get all of those seed pockets dry along with it. 
 
I told you this was easy!  Please, please, please remember this step the next time you want to make a pot luck dish or something for a family picnic.  There is no reason for your dish to be passed up because of one small mis-step.  And really, it takes seconds to do. 
 
Don't let your next pasta salad become the neighborhood flub! 
This tip works great when you are making your Weekday Lunch Salads, as well.  Your salad on Friday will taste just as fresh as your salad on Monday, with this one simple idea. 
 
Who knew tomato seeds could cause so much damage?

A Real Morning Pick Me Up

I love coffee.  I really do.

BUT... after that little pick me up, I am drained.  Tired.  Yawning.  Low-energy.

So, instead of that reliance on the morning cup of joe, I decided to try another route...  The morning cup of smoothie!  I have been drinking smoothies for breakfast for at least 3 months now.  Not only do I have the same spurt of morning energy, but it lasts well beyond those early hours of the day.  I also find that I am not snacking as much as I used to when I paired my coffee with a bowl of cereal or - gasp! - a toaster pastry.  I am sated until lunch, which is a huge deal for someone trying to watch their calories.

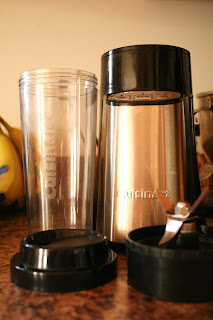
We were gifted a Cuisinart Compact Blender -- basically, Cuisinart's answer to the Magic Bullet.  I am more than pleased with this kitchen gadget.  It makes creating delicious smoothies quick, easy, and most of all -- to someone without a dishwasher -- simple to clean up.  The blender comes with 2 different cup sizes and 2 different blades, as well as a normal looking blender pitcher.  The blades screw right onto the cups, which become the vessels for blending.  When the blending is done, you can screw the blade of an twist on one of the provided drinking lids and you are on your way!


So, what do I put in my smoothies?  I'm am non-discriminatory when it comes to making a delicious smoothie.  My basic smoothie recipe can be added upon to create your personal favorite morning meal-beverage.

I start with 1 whole banana.  I break the banana into pieces and toss it into the blender. Bananas will make your smoothie creamy and filling.


Next, I add 1 small apple.  Personally, I choose honey crisp apples because they are fabulously delicious, but you can choose whichever type you like.  I use my apple slicer gadget so I can quickly and easily ready the apple for the blender.  This removes the core and makes the pieces a little more manageable for the blender.


Apples do several things for your smoothie.  They definitely add sweetness and they bring a little fiber to the meal.  The main reason I use an apple is because of its ability to make the smoothie thinner.  The juice in the apple helps makes the smoothie drinkable without having to add extra fruit juices or milk, and therefore add extra unnecessary calories and sugars.  Yes, the apple does add both calories and sugar to the drink, but in my opinion, putting a whole apple into the smoothie is a ton better than adding an item that has been processed.  -- Okay... where was I?


Next main ingredient... PLAIN yogurt.  Yes, vanilla or other flavored yogurt might taste better straight up.  BUT YOU ARE NOT EATING THE YOGURT STRAIGHT UP! -- Sorry for shouting, but I just wanted to make sure my point came across. --  The plain yogurt contains more calcium and protein per ounce and is therefore, better for you.  The sweetness provided by the banana and apple have already sweetened your smoothie enough.  I add between 1/4 and 1/2 cup of plain yogurt to the blender.  I really don't ever measure... just whatever looks "good".  I measured for a few days so I could provide some sort of guideline here!

 
Now, for the add-ins... I typically choose some sort of frozen berry -- aka, whatever is a good deal at the time that I am grocery shopping.  This week, its wild blueberries.

 
Once all of your ingredients are in your blender, hit puree and wait a few moments!  It really liquifies quickly in our personal sized model. 


I just love watching everything mix together and turn into a delicious liquified breakfast!

 
And Voila!  Looking at these pictures makes me want to whip up another smoothie right now!  Yumm!
 
 
I tried making green smoothies and adding some spinach.  I love spinach in my salads, but the bitterness it brought to my smoothie was not appealing to me.  The spinach was more of an after-taste, but nevertheless, it wasn't for me.  I get plenty of greens in my Weekday Lunch Salads, so I don't believe the addition of the spinach in the smoothie is really necessary.

Something else that I don't add to my smoothies...  any sort of protein powder or diet powder.  Have you read those ingredient lists?  I need a dictionary -- or google -- next to me to translate those things.  I look at them as added calories.  I use a calorie tracking tool on my phone that also helps me track my vitamin an mineral intake.  I find that with my smoothie alone, I meet my daily recomendation of Vitamin A and C.  I also found that with my regular diet, I have more than enough protein.  If you want to fill in the gaps of a lacking diet, the best way is through food.  Daily vitamins can also help, without calories, unlike those icky powders.  If you can't tell, I'm not fond of most supplements.

Some other options that I enjoy -- cuties --you know, those little tiny easy to peel oranges? --, frozen strawberries, pears, and peaches.  If I weren't allergic to pineapple -- I know, this is a travesty -- they would definitely be a regular addition to my smoothie.

What ingredients do you like to add to your smoothie?  I'd love to hear some of your ideas!

Wednesday, April 24, 2013

Saving Board Games, One Water Bottle At A Time

How, you ask, can I save board games with water bottles? 

Simple.  Save the caps for your water bottles when you are finished drinking and before you toss that bottle in the recycle bin and turn them into game pieces!

For this example, we are going to be making a Tic Tac Toe game, complete with a printable Tic Tac Toe board!

The best way I have found for my family to remember to save these caps is to put a ziplock baggie on the fridge.  The caps are very lightweight, so any decent magnet will do -- ours happens to be Darth Vader holding daisies.  I must also note that this doesn't have to be just water bottle caps.... any type of bottle with a drinking cap will work and may even eliminate a step in your game piece creation.


Our bottle caps add up pretty quickly in our home.  Our city water has a bit of a funk to it that isn't so good for drinking straight from the tap.


 For this specific project, we will need 10 bottle caps.


You will need two different colors of nail polish, preferably very contrasting colors.  I prefer to use a good quality nail polish (one I would use on my nails).  Chipped game pieces are just as ugly as chipped nails.  Today, I have chosen Sephora, by O.P.I. -- my personal favorite nail polish ever!
 
These are the steps that you may be able to skip.  If you have different colors of bottle caps -- say, from different sodas or sports drinks -- you wouldn't have to go through the effort of painting them.  This project just got a whole lot simpler for you!

 
And, if inquiring minds must know, the green color I'm using is called "It's Totally Karma".
 
 
The shimmery purply-blue color I am using is called "Here's Lilac-in At You Kid".  I'm not sure if my love of these nail polishes is for the vibrant colors or the whitty names.  Either way, they make for happy nails and fun game pieces!
 
 
And just like naiils... one coat is never enough.  Paint 5 pieces each in your 2 chosen colors.  I tend to just paint the top.  When you start painting on the bumpy sides, your pieces will have more chances to chip and won't last as long.
 

The second coat makes all the difference!
 
Now, all we have to do is wait for the paint to dry.  Make sure the paint is REALLY dry before giving these to your kids --I take no responsibility for nail polish stains on your carpet or dining table.
 

Now, we can save the Earth by reusing our tic tac toe board game over and over!  I know my kids are constantly going through sheet after sheet of paper playing Tic Tac Toe.  You may use the printable Tic Tac Toe board I have provided here for personal use, but please link back and/or ask consent for any other purpose.

Just imagine how many ways you can use these simple manipulatives!  I have some more ideas up my sleeve that you will just have to wait for.  Until then, hopefully you can enjoy some Tic Tac Toe, or even that game of Sorry you haven't been able to play due to lost pieces. 

Have fun and continue saving your Earth!  Happy Earth Day!

Tuesday, April 23, 2013

Fractions Are Tricky

or so says my 7 year old...

The only fraction you need to worry about here is 1/3.  The "rule of thirds" is a basic photography concept that can give your photographs some interest!  This isn't just a guideline for photographers.  Anyone who takes any type of picture, whether it be a DSLR camera, a point and shoot camera, or even a camera phone can benefit from this tactic. 

Most cameras offer a grid option that you can choose from your settings menu which places the 'rule of thirds' grid right onto your camera screen.  Easy Peasy Lemon Squeezy!

Now, what does the "rule of thirds" do??  Lets have a look...


Here, I have placed the subject of my photograph (my sunglasses) right in the center.  Yes, it is an adequate picture that shows off my $10 sunglasses -- if you lost sunglasses as much as I do, you'd understand that $10 is a steep price to pay for them. 


Looks pretty good, right?  I mean, its not going to win any prizes or anything, but its a decent black and white of a pair of sunglasses.  Now, lets take a look at our "rule of thirds" grid.


 Here, you can see how the glasses are almost perfectly placed right in the center of the photograph.  Lets take a look at the sunglasses again, this time with the center of the glasses placed at one of our intersecting lines -- One of our "thirds".
 

Its a little more interesting,right?  This would be the photograph where my mom would say, "Thats a really nice photo.  Too bad its not in the middle," and where I would turn my head with an amazing eye roll, thinking all the while "I'm trying to be artsy, mom!", but never actually saying it because... well... It is my mom after all.
 
 So, lets look at the rule of thirds applied to this example.


Right.  Here you can see where the center of the glasses is interected by the lines in that top right corner.  Rule of thirds.  Ka-Bam!

But.... but not exactly what we had in mind.  Where is our interest?

I have one last example prepared.  This is really what we are trying to achieve!
 

 Take a look at the glasses and their position in the photo.  They are turned to the side slightly. They may appear to be centered, but check out the focus.  There is a bit of a blur towards the bottom lefthand corner of the photo.  The sharpest point in the photo is again, at the intersection at the top right of the photograph.
 
Lets look at the grid.


I never knew I owned such interesting sunglasses!

 
Lets hope you have more interesting subjects than some $10 sunglasses, but anything inanimate can provide some great practice -- running toddlers? Not so much.
 
There you have it.  Photography lesson numero uno.


Sunday, April 21, 2013

My Husband Is The Chef

And the reason I am stating that is so when I post last night's insane dinner failure, you won't expect that my food knowledge exceeds what my husband has managed to sink into my dense skull.

I started out good-- or so I thought-- with a delicious looking idea from Pinterest. I had all the ingredients -- leftover spiral ham I pulled out of the freezer, eggs, a tube of refrigerated biscuits, some zucchini -- sounds good, right? I have been wanting quiche for a while and this was supposed to be a kind of knock-off, easy to make quiche-esque dish.

Supposed to be.

Needless to say, we ended up going out for dinner last night. Next time, I'll leave the real quiche making for my husband and skip the shortcuts!

 
As you can see.... disasterous!
 
My husband, being the extremely intelligent man that he is, decided it wouldn't be best to point out my (or the Pinterest recipe's) failures right that moment -- or day!  First off, he told me that using refrigerated biscuit dough would never work... as it always rises a ton.  Secondly, I probably put a tad too many eggs for the size pan I was using.  And lastly, vegetables contain a lot of water.  So, its best to cook them first before adding them to anything like this, so the water is already cooked out and doesn't effect the outcome of sensitive food items, like eggs. 
I appreciate the learning experience, but like I said... My husband can make some real quiche for me next time I feel like having it.... if ever!

Saturday, April 20, 2013

Weekday Lunch Salads

I love to eat out as much as the next person.  Eating out for me = splurging on foods I typically don't eat at home.  With all of the easy and fast foods everywhere, it can be way too simple to run out and grab lunch.  Who has time to make a decent lunch when there are 10 places ready to make it for me right down the road?

I've learned -- and so has my waistband -- that the best way to combat my lazy lunch attitude is to eliminate excuses.  So, TA-DA!  I came up with the idea of making weekday lunch salads.  Once a week I spend about 15 minutes prepping healthy lunches for the entire week.  Now, making lunch is as easy as grabbing it out of the fridge.

Ziplock makes some great containers that are perfect for a filling lunch sized salad.  I can't handle whimpy salads.  These containers can handle everything I like to cram in them -- and then some! 


The containers that I use are the 4 cup size.  They stack great and fit in my fridge compactly.

My bottom layer generally consists of greens... I grab handfuls of romaine lettuce and some nice crisp spinach and toss it in the bottom as a base.  I must add that it is very important for all of your produce to be nice and dry.  After rinsing your ingredients, its best to pat it dry with a kitchen towel or paper towel.  This will help your salads last longer without wilting or getting mushy.  Mushy salads are NOT yummy.

Big, juicy greenhouse tomatoes or heirloom tomatoes are essential for me.  They add color and a perfect sweetness.  De-seeding tomatoes reduces their liquid content and helps them last longer.  Its super easy to do -- run your sliced tomato under running water and run your finger across the seeds while pushing them or grabbing them off the meat of the tomato.  Voila!  Pat the tomato dry and its ready for the salad!

The rest is up to you!  What are your favorite salad toppings?  I love hard boiled eggs and will blog about how to prepare the perfect hard boiled egg pretty soon here.  The best ingredients are things that are local, in season, and most of all, things you like.  If you put things in your salad that you don't like, then you are less likely to eat it.  Tuna, cheese, cucumbers, carrots, celery, radishes, chicken breast, edemame, black beans, corn, arugula, and roasted red peppers are some of my favorite toppings. 

Now for the dressing... You use a lot less dressing when you toss your salad with the dressing as opposed to just pouring it over the top.  I despise low-calorie dressings.  They have a weird flavor that I just can't get over and a lot of times, I find odd ingredients that I can't pronounce.  So, I stick with either homemade dressing, vinegar and oil, or even salsa!  When I do reach for store bought dressings, I am a label reader.  I try to find a variety that contains the least amount of ingredients and the highest percentage things I can pronounce.  Add your dressing right before serving.

Weekday lunch salads have helped turning this prior fast food frequenter into a more whole eater.

Enjoy!

Friday, April 19, 2013

Just So You Know

I go by Steph...  not Stephanie... and definitely not Stephie.

My life is hectic, amusing, and sometimes I would even classify it as exceptional with a dash of did-that-really-just-happen?  Three awesome children and a supportive husband make me crazy journey with me through the craziness. 
 
We recently relocated from metro Detroit to a small town about 2 hours away -- 2 hours away from friends, family, and all of our local hangouts.  We are slowly becoming familiar with our new little whistle-stop and are creating a new home here.

This blog will serve as documentation of our lives as we discover, thrive, and experience this new place we call home.